Delegation Made Awesome (Salesforce1Selfie Number2)

Standard

With my first salesforce1 selfie I took on user setup and reduced my “Click Load” when it comes to setting up users.

For this salesforcesforce1selfie, I am taking a swipe at the delegate process.

The org I support has quite a few approval processes and within these processes are a mix of related user (manager, for example) and named user approvals. Supporting these processes can be quite a challenge, especially around summer time since we are not using the delegate functionality. We have tried to roll out delegates, but never quite get off the ground with adoption. After taking a close look at the delegate function, reviewing notes from our last attempt and talking to the SFDC_IT team member I believe the lack of adoption is due to:

1)      No obvious click path to delegated approver screen (Click on Name, Click on Drop Down, Select “My Setttings”, Click on “Approver Settings”, enter delegate )

2)      Unable to start / stop time delegates

3)     Can’t turn on via mobile

4)     Too much mail if the Delegate is left “on” (See #2)

I believe that if I can add functionality that will help with the above, I can increase adoption of delegates. At the very least, like my clone user app, I can use it myself during the summer holiday season!

Hold on tight, here we go!

images

We got a long way to go and a short time to get there!

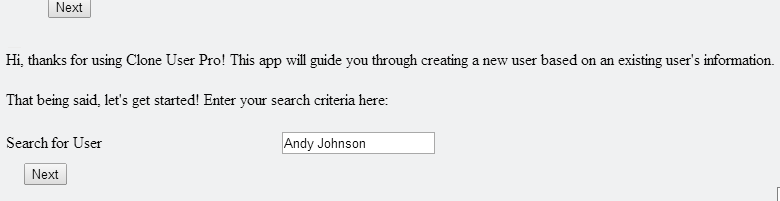
First things first, I needed to create an input method for my users that could be both easy to use and upfront. Therefore, I built out a custom object / tab combination, which I named “Out of Office”.

Out of Office

Can’t miss that!

I have as few entry fields as possible, both to speed the time to release but to also make it as easy as possible for the user:

1)      Start Time – Defaulted to current date

2)      End Time – User selectable date fieldThree Fields, one defaults

3)      Delegated Approver – Lookup field to user table

*Now, you might be reading this and shouting / typing furiously/ muttering about missed opportunities. I agree with you, and I feel certain that future revisions will get new / better functionality (Filtered Lookups, Approvals, On behalf of…etc), but this is about a good foundation to build on.

A quick look at workflows and I can see that I will have to do this with a combination of workflows and flows since I cannot update the Delegated Approver field with workflows, and

Narf

You know what I am talking about

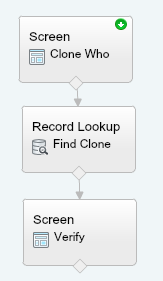
In the interest of time, I am going to give an outline of the methods used to get this functionality up and running rather than the step by step.

Step 1, FUNctions used to update the delegate:

Workflow “OOTO Created” is triggered up on record creation. This workflow has two immediate actions, an email alert to both the delegate and the record owner and a flow trigger that runs a flow in the background that handles the actual update to the delegate. The flow really is basic, just a record update. I threw in a lookup out of habit.

2014-04-29 07_56_00-Presentation1.pptx - PowerPoint

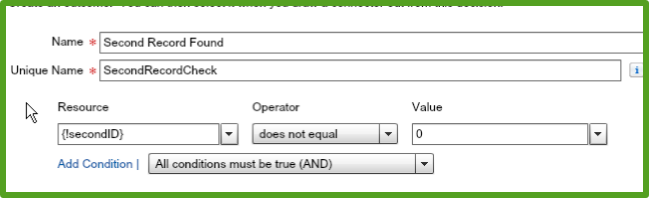
The workflow also has a timed based action, which is the secret sauce. This time based action is based on “return date” – 0 and ticks the box “Back in Office”. Do not overlook the re-evaluate workflow rules after field change check box!

2014-04-30 08_30_30-Field Update_ Mark as returned ~ salesforce.com - Unlimited Edition

Step 2, FUNctions used to remove the delegate

Workflow “Remove Delegate” is ran when the field “Back in Office” is set to TRUE. This worklow has two elements (as I wrote it), but could get away with one. The main element is the flow trigger. This trigger launches another basic trigger that just deletes out the delegate from the record owner. The only thing special I did on this was to put in an extra field update in the flow so I can tell if it ran. I have a similar field update in my workflow. I found these to be very helpful when testing because I could visually observe how my updates were working.

2014-04-30 08_42_16-Workflow Rule_ Remove Delegate ~ salesforce.com - Unlimited Edition

Move along, nothing to see here

Now, for the brass tacks, how does it work? Well, it works pretty dang good. I have been monkeying around with this for a couple weeks now and I can attest to the basic functionality. The only real weak link in the process is that I cannot directly influence the field “Receive Approval Request Emails” setting via the flows. That, however, can be handled with business process.

2014-04-30 08_45_27-User Edit_ Andy Johnson ~ salesforce.com - Unlimited Edition

Curse You!

Now, for the 10,000 dollar question. How does it look on Mobile? Well my friends, it looks pretty darn good. Salesforce1 does such a nice job of packaging up the objects created that you get a very nice experience out of the box. This is such a nice contrast to previous mobile versions. I can focus now on making the user experience that much better.

2014-04-29 07_56_56-Presentation1.pptx - PowerPoint

Yeah, that is awesome

For example, I built out a field that shows a message based on a couple parameters: “if(Back_in_Office__c =FALSE,”Out of Office, returning “& text(Return_Date__c) ,”In Office”)”

I added this field to a new compact layout, and viola, the user can now, at a glance, see if they are in office or out of office, and if they are out of office, when they are coming back (NEVER!)

In OFfice

Awwww

Out of Office

Woo Hoo!


So there you have it, another piece of adminsitrivia solved with Salesforce, Visual Flows, and Salesforce1


Andrew


Advertisement

More information about my #Salesforce1Selfie

Standard

Salesforce.com is running a twitter contest asking for selfies of Salesforce1 Apps. The majority of posts Salesforce is receiving are user-centric and I think that is great, but just not the way I am going (for now). I built an app for the Administrator. More specifically, I built one for myself. The reason is pretty simple, during my day I get to do a bunch of different things and most are pretty fun. However, setting up new user is not on that list. This is because there are two typical scenarios:

1)      “Hi SFDC Team, please set me up in Salesforce with permissions like my colleague”

2)      “Hi SFDC Team, please set me up in Salesforce” Both of these scenarios can get messy fast…and by messy I mean way too many clicks. I did a quick sketch in Visio and found that at a very high level, there are 7 steps involved in the first scenario. That is way too much (In my opinion) for me to do a couple times a week.

TOO MANY STEPS

More fun than…checks list…not much

Therefore, I decided to make something that will reduce the number of steps AND let me easily share out the process AND can be done via the mobile AND be my entry in the #Salesforce1Selfie contest that hopefully will ensure I can stay somewhere awesome during Dreamforce 14.

2014-04-21 21_09_33-Fitzgerald Hotel - Google Maps

The Fitzgerald…not a bad place, but if I win I won’t be staying there.

There are three basic ingredients to my selfie, which I will go into more detail on in three carriage returns: 1)      Flow

2)      VisualForce Page (Don’t Panic!)

3)      Navigation

The flow starts with the basics “Input, Query, and Output” structure. My input is the name / email / id of the clone source. You can search three different ways from just one text box (More on that here, “One (flow) field to rule them all”). The query returns all the information you need to create the user record, which I had found previously while working creating users with the Excel Connector.

Pulled from Clone Source

Set it and Forget it!

I display that information on the confirm screen, which is where the cloned user email / name is entered. The finish button creates the user.

Create User Fields

And this is why I automate this stuff.

There is one interesting thing I need to call out here. If you were to create the user through the regular method, alias is autogenerated. Not a big deal except that Alias is limited to only 8 digits. I just default it to “NewUser” and will direct the new user to change it. You could do something fancy with workflows if you want. At this point, I have a flow that is crazy handy for use just with in the UI. I do plan on modifying this before I push to production so that the clone user search screen is skipped when launched via custom link on the user page. But what about mobile?

But will it load salesforce 1

“Where is the salesforce1 App?”

I had decided that I wanted to use flows as an app rather than an action. The reasoning is that while in the webUI I am more than likely going to be launching the flow from a user I have found, but if I am accessing via salesforce1, I will be providing the search criteria myself. Therefore, I need to make an app. To use a flow with in an app or even a page is going to require just a little tiny bit of code. It is such a small amount, I don’t even have to give up my hashtag #ClicksNotCode for this blog posting. There is some official documentation out there that will talk about embedding flows within a visual force page. It is really good stuff and I highly recommend you reading it. I have used both the official method and also just used an iframe. Either way seems to work out just fine. You need to make sure to check the box “Available for Salesforce mobile apps”.

iframe visual force

Don’t take away my Clicks Not Code Card!

One thing you might notice is that your performance on the mobile device is not the same as in the simulator. I believe this is because the basic iframe / interview code given is making the device work hard to format the flow page. I consulted with Google and found a write up on panya.com that had a couple things I wanted to try. I was able to see a HUGE improvement in load times by putting in a few extra lines of code. Another tip is to just save this code somewhere and use it as your template.

FASTER!

I am giving it all she got’s captn!

“<apex:page showheader=”false” standardStylesheets=”false”> <html> <Head> <Meta name=”viewport” content=”width=device-width, initial-scale=1″/> </head> <body> <flow:interview name=”Clone_User”/> </body> </html> </apex:page>“ Now that I have my flow and my tab I am nearly ready to roll. I just need to add it to the Salesforce1 navigation. You can find the nitty – gritty here, but it is just as easy as going to Mobile Administration and Mobile Navigation. NOTE! If you do not see your VisualForce tab here, got back and verify that you checked the box “Available for Salesforce Mobile Apps”. Also, I have noticed along with some other caveats, visual force pages that were created before salesforce1 came out are only checked with the Salesforce Touch option. It looks like they cannot be modified to run with in Salesforce1. The punch list is complete at this point. To verify you can use the Salesforce1 simulator (<<Org>>.salesforce.com/one/one.app) or you can also see the results on your mobile device pretty easily by just logging in to your sandbox environment.

flow GO

Step One

Confim screen

Step 2

I really like how this turned out. In a very small amount of time, I was able to: 1)      reduce the amount of clicks in my current process by about 80% 2)      Create a nice URL based process 3)      Create a mobile app for admin use “on the go”   As always, let me know if you have any questions, comments, concerns or interesting ideas you would like me to research!   andrew

One (Flow) field to rule them all

Standard

I love it when in the course of an average day you have that moment when the light bulb gets turned to on, the heavens part and there in front of you is something new and exciting.

Image This is how my light bulb moments look, don’t judge me

For example, I was building out my clone user flow for #salesforce1selfies and started thinking about how I had my search page set up. It was fairly standard with a text box where I would enter in a user ID but like Freddy Mercury, I want it all.

I wanted to be able to search on name,email and user ID and I wanted to do it from within one text box.

Image“One field to rule them all, and in the flow logic bind them”

Really, it sounded pretty simple, but then again, you can sum up the lord of the rings trilogy by saying it was just about taking out the trash.

“All we have to do is throw the ring away, easy – peasy”.Image


Actually, it was easy…I mean, this was something I did while on my first cup of coffee. I started with my flow Mirepoix, input screen, query, output screen.

ImageIt’s just the base! You have to liven it up yourself!

To that base, I added in a decision with three outcomes:

Image

1)      Input Text “Starts With” “005”

Image

2)      Input Text Contains “@”

Image

3)      Else assume text is name

Image

These outcomes are each linked to a unique query and assignment:

1)      Input Text “Starts With” “005” –> Query ID with Input Text –> varMatchType = “UserID”

Image

2)      Input Text Contains “@” –> Query Email with Input Text –> varMatchType  = “Email”

Image

3)      Else assume text is name –> Query Name with Input Text –> varMatchType  = “Name”

Image

I put the varMatchType on as a visual debugger because I only have one output screen and I want to be able to see visually how I got there. Image

Fun and games aside, how does this work? Well, it works great! Here are some screen shots to prove it:

ImageImage


I would like to think it is because of my super ninja / bow / stealth / flow skills, but the reality is this is just a really good piece of functionality. I really like the potential here. Imagine creating one flow that does this type of analysis and routing…you could use it all over the place!

Hope you enjoyed this…questions or comments, let me know!


Andrew

Making a Dynamic Choice That Much Better

Standard

Let’s say that you are writing a flow and at one point you are going to prompt your user for some data that will then be used to populate a dynamic choice field.

Tell me hot shot, how do you handle just one single record?Do you make your user select one and then click through, or is there a better way?

Image “Can I choose not to do Matrix 2 and 3?”

Well, the good news is, you can make a smarter dynamic choice flow. By using some logic and a couple queries, you can choose to display the dynamic choice or bypass it. The reason we can do this is because instead of checking to see how many records are returned, we are just going to check to see if there is more than one. 

The example I am going to use takes a user input of “Last Name” and will check to see if there is ONE or ONE+ records and then determines if the user should see the dynamic choice page or a generic page displayed to the user.

Image


1)      Query1 is based on the user input. ID of the first record is passed to a variable (VarID1)

Image

2)      Query2 is based on the user input AND the ID cannot equal VARID1
Image

3)      The results of Query2 is passed to a variable (VarID2). This variable has a default value of zero

4)      Decision point evaluates VarID2 and if the variable DOES NOT equal zero, the dynamic choice screen is presented. Default outcome (in this case) is just a display screen.

Image

5)      Take the rest of the day off (just kidding)

I wish there was more to this, but it really is just a nice piece of logic and the fact that your user doesn’t have a click gate if there is just one record returned will probably go unnoticed, but you will know the truth!


EDIT! This blog post really covered this on a high level. If you want a blow by blow account, head over to my buddy Rakesh’s blog…