Salesforce flows are a magical thing, like good coffee at work and unicorns.

This is how I want my coffee delivered.
I have come to realize that there are limits to even the most magical things (BOOO!).
The limitation I have found in flows is around how you search for records…but, let me be clear, it really isn’t a big deal. For most people, finding records using the typical “equals”, “contains”, “starts with” and “ends with” functions will work just fine. I however, found myself going down a path where that wasn’t going to quite cut it. The challenge is how to search on a text input in a manner that is more google like. I don’t know what the kids now a days call it, but back in my day, we might call if “Fuzzy Matching”.

Fuzzy, Not Fozzie!
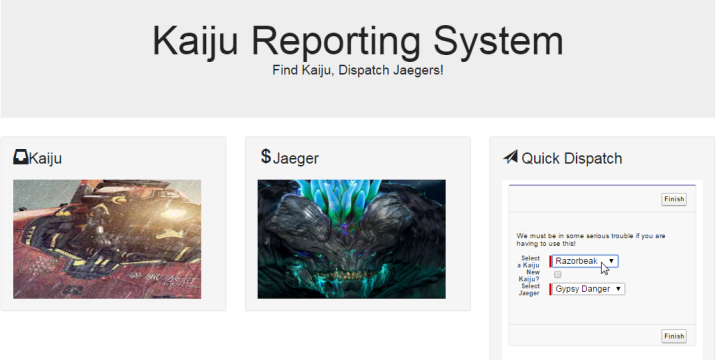
For example, let’s revisit my Jaeger Dispatching System (Special Note, Pacific Rim 2 is scheduled). This system uses dynamic drop downs for the Jaegers, but, what happens when you have a bunch of Jaegers’? You can build out a record search based on a text box, but, as mentioned before, you are limited to “equals”, “contains”, “starts with” and “ends with” functions. At this point, you might be saying, fine, just use a “contains” operator…and that would work, except what happens when the user spells something wrong? Contains is just two wild cards, so if you entered in “Dangur” instead of “Danger” you would not get a hit.
What happened next is pretty funny. I started thinking about how there are patterns in words…and then started thinking about how the pairs of letters could work. Spoiler alert, it totally worked. I proved it in Excel by just using a vlookup and some formulas, so I got pretty excited. It was then that I googled this matching pairs thing and found out that yep, some one wrote about all the fancy math behind it.
http://www.catalysoft.com/articles/StrikeAMatch.html
So, after building out the proof in Excel that this would work, I set about trying to get this to work in Salesforce…specifically a flow. I want to be able to enter in some characters into a text box and see returned results based on how well they matched my search term.
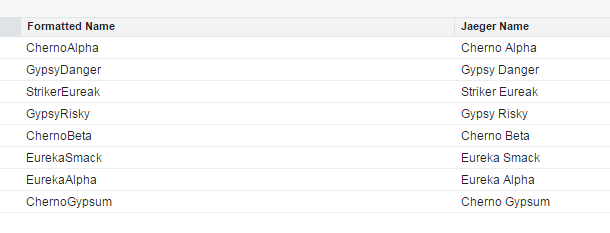
The first thing I did is create a field that removes the spaces from the Jaegers’ names and made them lower case. I don’t want it being “Cherno Alpha”, I wanted “chernoalpha”. This is done via formula field. If doing this in real life, I would build out my formula to also remove punctuation, but this is just for my Jaeger dispatch and my blog, so I am just removing spaces.
Thus, concludes the non flow part of this blog…what follows next is like 100% awesome, you have been warned.

Woot! FINALLY got to use this meme!
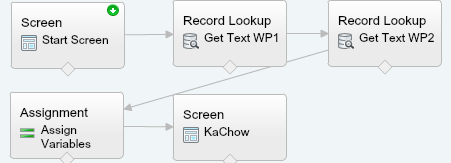
The first couple things are pretty basic, I have a start screen that has a text box. Next, I have a fast lookup on my Jaeger object. This gets all the Jaegers and puts them all in a collection. Next up is my loop, where I go through each Jaeger record. The only “gotcha” is that when you do the fastlookup, you need to bring over your formatted text from the record. Screen shots of this would be pretty boring, so here is a picture of all the giant robot toys.
Within the loop, I start with two assignments that copy the formatted Jaeger Name (no spaces) and the search string to variables.
I am going to use these variables for the rest of the functions, including the formulas. I take the search string that was entered and format it up. I remove the spaces, count how many pairs I have and if the value has a remainder, I also remove the last character. I do this because otherwise the matched pair logic would be searching on a single digit, which would skew the results. The formula also checks if the search string is just 3 char, and if it is, it will treat these three char as one “pair”. Pictures and Text!
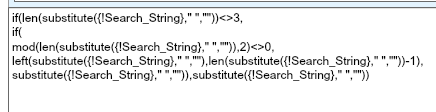
if(len(substitute({!Search_String},” “,””))<>3,
if(
mod(len(substitute({!Search_String},” “,””)),2)<>0,
left(substitute({!Search_String},” “,””),len(substitute({!Search_String},” “,””))-1),
substitute({!Search_String},” “,””)),substitute({!Search_String},” “,””))
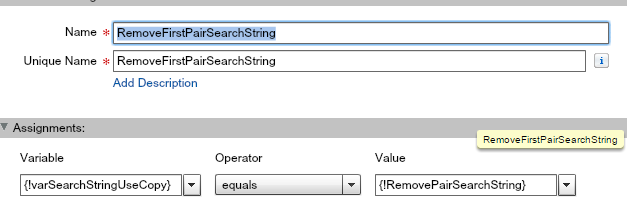
Now I have to compare my first matched pair to the formatted name. of the search string that was formatted. I use a formula to get my matched pair:
if(len(substitute({!Search_String},” “,””))<>3,
lower(left({!varSearchStringUseCopy},2)),lower(left({!varSearchStringUseCopy},3)))
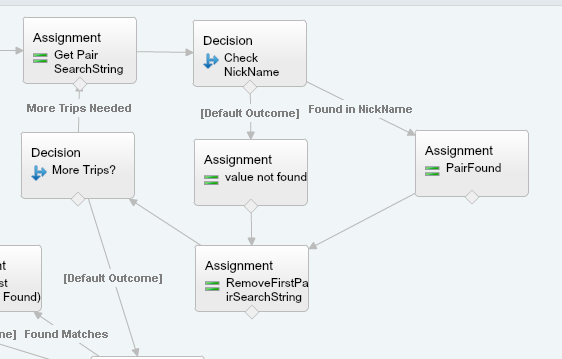
The flow will next do a name check via the decision function. If the Formatted Jaeger Name contains the current matched pair, the flow adds a value of 1 to the counter variable and adds the current pair to a variable that will show the matches and the ID of the current record to another variable. Ugh, that was hard to read, here is a picture:
If the pair is NOT a match, well, I don’t really do anything with it but you might want to shove it to a debug variable. In fact, if you are starting this from scratch, I would HIGHLY suggest you do this!
Next up is yet another assignment, this time though, we are removing the pair was just searched on. This is done with, you guessed it, a formula:
if(len(substitute({!Search_String},” “,””))<>3,
substitute({!varSearchStringUseCopy},left({!varSearchStringUseCopy},2),””),substitute({!varSearchStringUseCopy},left({!varSearchStringUseCopy},3),””))
Once that is completed, we check to see if there are more pairs to check. This is done by looking at the number of pairs left after the current pair is removed. This is in a formula I like to call “DisappearingSearchString”:
len({!varSearchStringUseCopy})
The whole process looks like this:
If all the pairs have been used, the flow then checks to see if there were any matches with a decision point on the counter variable. If yes, then we add the matching data into a variable and then start the loop all over again. Because we will want to display some results in a table like format, be sure to append a text template that has a line break at the end of the string. To do this, create a text template with <br> in it.

One of the things I really wanted was a way to see how many of the pairs were found in a given record. I do this with this formula:
({!varTripCount}/{!frmSearchStringPairs})*100
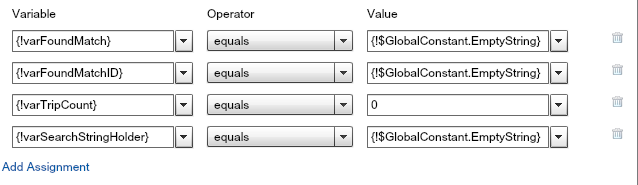
Before the loop starts all over again, any used variables are reset:
So, enough talk! Let’s see how this works! For comparison purposes, I put in an alternate lookup that will use the “Contains” search function of what was entered in the input.
I also added more Jaegers, 8 in total!
boom
First search string is going to be “Eureka”:

and here are the results: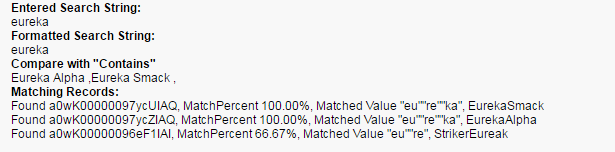
The “Contains” function did what I expected and returned two records, “Striker Eureka” and “Eureka Smack”. However, it did not find “Striker Eurek”, but the matched pairs function did!
Let’s try this on another scenario. Suppose there is someone new in the Jaeger Dispatching Center and they forgot that it is “Cherno Alpha” and they enter in “Alpha Cherno”.

The “contains” search function would literally return ZERO results, whereas the matched pairs function would show an 80% match with Cherno Alpha.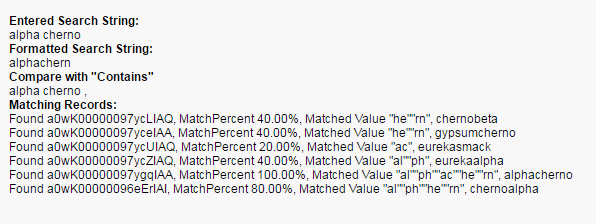
So, there you have it. With a bit of work, you can do fozzie…err…fuzzy search results with in a flow with Zero coding!
As always, if you have any questions, comments, or suggestions, please let me know!
Andrew


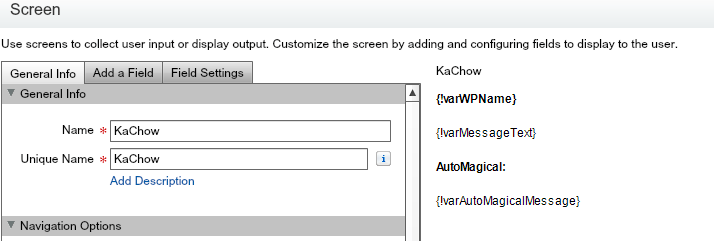


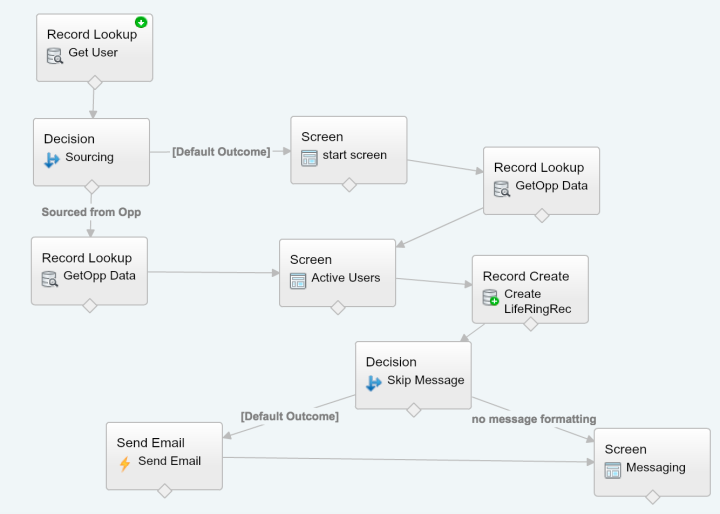 If it is launched via the app, it just pulls up a list of the users open opps. The user selects one and then is presented with a list of current active users and a selection around communication methods. Selecting email will send an email, but selecting text sends out an email using the email to phone number “hack” (
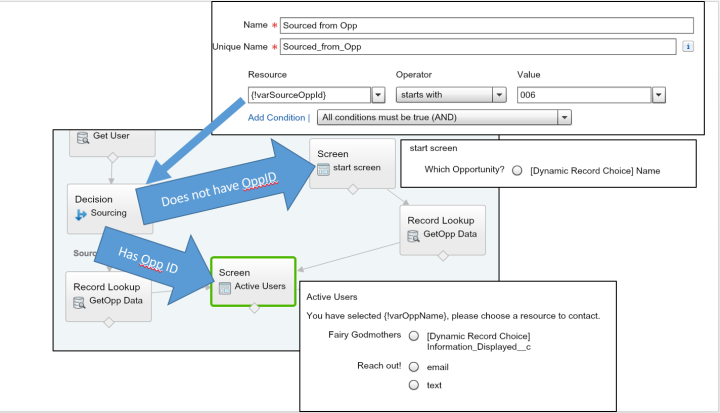


 .
.


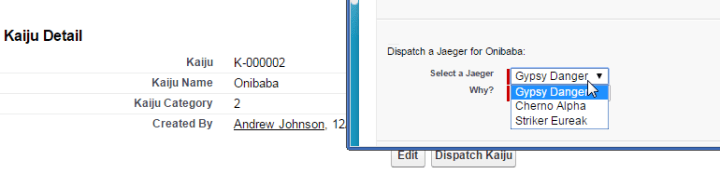 Yep, the flow determines that I am running a dispatch from a record detail and points me to the right screen!

 Between summer vacations, coaching soccer and cub scouts, there has not been much idle time for this boy to blog, which stinks because there has been so much fun stuff figured out!

