Smarter Text in Flows

Standard

As Salesforce admins, I hope you have figured out that Flows can make your system super smart. I think this is a smart little hack to flows that can help make them even smarter!

Hopefully not this smart

Here is the setup. You have a flow and in this flow there is some data that is stored in variables. Because this data wants to go forth and adventure, you might use a text template to put some, well, text around those variables so that it makes sense. The text template would then be used in an email alert (just for example).

The thing is, as we all know, the minute you get the text of ANYTHING dialed in, someone asks for it to change. So, into the flow you go, modify the text template, save a new version, etc, etc, etc.

But, what if there was a better way? That question was rhetorical, since there totally is a better way.

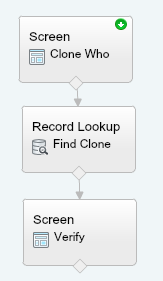
For this blog example, I am just going to have a two screens, one as a starting point and a final screen that will substitute for the above mentioned email alert.

flow overview

No clever caption for this

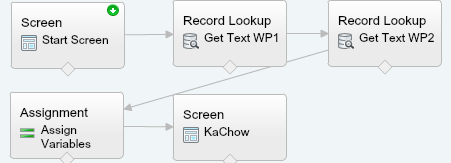
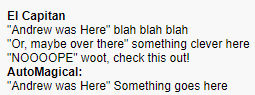
Notice, there is NO text templates in this flow.

Look - No Text Templates

But, the end screen has all this text? WHAAAT?

Final Product

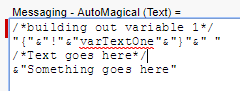
And, just to prove I am not pulling a fast one, here is what that field looks like…it is just variables.

and just to prove...

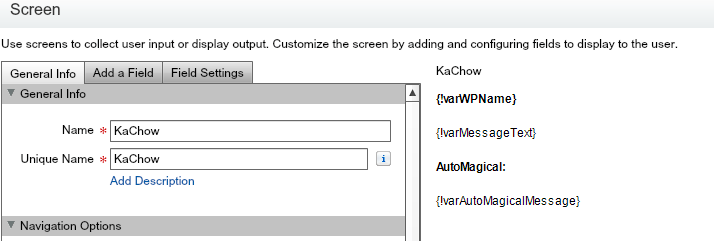
Instead of using a text template, I am using a text field on an object. The trick here is that you have to enter the variable technical names (Curly brackets, exclamation points) into the text field. This text field is then pulled in the flow via the record look up and will accept the values from the variables.

Really, this is acting JUST LIKE A TEXT TEMPLATE, but with the advantage being that if you want to modify the verbiage you don’t have to go through the modify / save as / activate cycle.

But, we can make this EVEN BETTER! Obviously, having to enter the technical variable name limits how many people can actually use this. But, by adding a bunch of code…LOL, just kidding. We are going to build out a formula field instead. You have to do some gymnastics to get the formatting to work, but once you have it built out, you now have a formula that will show up on the actual records itself and used just like the text field above.

formula           formula on screen

And, the end result is the same!

automagical results


so, what do you all think? useful? not? any suggestions? I even take requests if there is a weird question (about salesforce) you might have.


Advertisement

Attaching a copy of an email alert in Salesforce

Standard

How long has it been? A long freaking time!
Long timeBetween summer vacations, coaching soccer and cub scouts, there has not been much idle time for this boy to blog, which stinks because there has been so much fun stuff figured out!

But, here I am, eating a turkey sammich, listing to some EDM on Slacker Radio and trying to get a blog post cranked out for you all.

What I am going to blog about is an annoyance that has been going on for quite some time… the issue of workflow email alerts. In fact, this idea is over 5 years old!

See, when you build out an email alert and it fires…well…it just fires. You can do a work around that involves carbon copys to an email to salesforce box or creating activities, but those workarounds are either not scaleable or they don’t give you much more information than “this email was sent!”.

But, I did find a work around that is scalable using my favoritest thing ever, flows*. Now, did you see that little thing there? That Asterix? Yep, that is there for a reason. It is there because I wrote this out using flow triggers. I am sure you can do this with process builder, but I am just documenting the flow trigger function here. I like process builder, but in this case, I just need to crank something out quick, so I am using triggers.

The “Too Long; didn’t read” version is this. I created a flow that runs via the workflow (remember, I am using flow triggers!). When that flow trigger runs, it will do two things. It will send off the email alert AND create an emailmessage record. Yeppers, I said create an emailmessage. What I have found is that within salesforce you can create an email record through a flow and it will happily sit there. The trick is that you will need to pass the record ID from where you are starting and use that ID for the “parent ID” field on the emailmessage record.

This is a good jumping off point if you want to venture forth and tinker around yourself. For those of you that want more details, here ya go!

My assumptions at this point are that you are comfortable creating your own method of running this flow. As long as you can pass variables over from the record, you should be good to go. This flow only has two elements. The email alert (which is already built) and the record create for the email message. There are a bunch of things you can build out when you create the email message, but I am just going to cover the basics.

  • Parent ID – this should be the record you want this emailmessage living under. In my case, it was, well, case.
  • Status – Status is a funny one. It is displayed in plain English but the value is actually numeric. In my case, I am recording a copy of a sent email, so I used a status of 3, which is “sent”.
  • EmailMessageBody – An interesting thing about this method is how the text is displayed. You will actually be creating the emailmessage.body by using the field “HTMLbody” and to make it so the text looks nice, you will need to do the following:
  • Create a text template called “LineBreak”. This text template will just have the HTML value for break “<BR>”

Line break

  • Create a text template called “Email body”. Enter your data and insert the text template “linebreak” wherever there should be a line break. If you need to get values from the parent record, insert them here. I choose to pass them all over via the flow trigger, but you could just as easily do it with a requrery.

Linebreak being used

The end result is that the emailmessage you created via the flow will have a similar look / feel to the email that was sent out via the alert. Actually, it will look way more like the Text version, but really the point is to have this copy not so much to look pretty.

As I said before, I will leave the method of running this flow up to you, so let’s talk about the results.

By doing this, I was able to get a copy of the alert email attached to the parent. I was then able to remove the activity creation on the workflow since that was how we were noting that an email was sent out. The email copy is an actual copy, so we know what was sent out, which you couldn’t do through the activity. As an added benefit, running this via the flow allowed me to do some extra shenanigans that you really cannot do through a workflow, like running queries on other objects and adding them to the email.

The last benefit is crazy obvious, this is a LOW maintenance function. If a new value is added to the email alert, I (or another admin) just needs to add it to the record creation function…no dev time needed!

As always, let me know if there are questions / comments


andrew


Why, Process Builder, Why! (Updated – Humble Pie Edition)

Standard

I published a blog post last Thursday and pushed it up to the Salesforce Community. I am a big fan of the community because there is always lively discussion and sometimes, like this time, Salesforce legends pop up! Shelly Erceg is way up yonder on the Salesforce org chart, so it is always fun and a bit nerve wracking when someone like that drops some knowledge on you!

SNAP!

BTW – Not the knowledge you want dropped on you!

Turns out, the documentation I had found was out of date and that in fact, there was no limitation…which means that the process builder was borking out from something I did (D’oh!).

Doh

After a quick trip to the corner for some weeping, it was back to the grind to figure out just what the heck was going on!

Well, here is the short version! I started with two actions and once that was working, I cloned the process and created the rest of the tasks (13 of them ) by hand! It turns out, that when I did that, I set the “Owner ID” on one of the tasks (number 9 to be exact!) to the case ID instead of case owner ID.

Now, I did do troubleshooting before I created the idea and subsequent blog post. In fact, this process has at this time 16 versions and I created at least half of those before I found the out of date article.

Bottom line is this…Process builder is NEW and most of us SFDC veterans will remember the teething pains that were felt when other new functions got rolled out. Heck, I remember S-Controls and the anguish that removing those caused! Process builder will get better and it is because of the dialog and openness that exists on the community and from people like Shelly!

BTW – I created a new category on my blog, “Humble Pie”, because I am sure this will happen again sometime!

One (Flow) field to rule them all

Standard

I love it when in the course of an average day you have that moment when the light bulb gets turned to on, the heavens part and there in front of you is something new and exciting.

Image This is how my light bulb moments look, don’t judge me

For example, I was building out my clone user flow for #salesforce1selfies and started thinking about how I had my search page set up. It was fairly standard with a text box where I would enter in a user ID but like Freddy Mercury, I want it all.

I wanted to be able to search on name,email and user ID and I wanted to do it from within one text box.

Image“One field to rule them all, and in the flow logic bind them”

Really, it sounded pretty simple, but then again, you can sum up the lord of the rings trilogy by saying it was just about taking out the trash.

“All we have to do is throw the ring away, easy – peasy”.Image


Actually, it was easy…I mean, this was something I did while on my first cup of coffee. I started with my flow Mirepoix, input screen, query, output screen.

ImageIt’s just the base! You have to liven it up yourself!

To that base, I added in a decision with three outcomes:

Image

1)      Input Text “Starts With” “005”

Image

2)      Input Text Contains “@”

Image

3)      Else assume text is name

Image

These outcomes are each linked to a unique query and assignment:

1)      Input Text “Starts With” “005” –> Query ID with Input Text –> varMatchType = “UserID”

Image

2)      Input Text Contains “@” –> Query Email with Input Text –> varMatchType  = “Email”

Image

3)      Else assume text is name –> Query Name with Input Text –> varMatchType  = “Name”

Image

I put the varMatchType on as a visual debugger because I only have one output screen and I want to be able to see visually how I got there. Image

Fun and games aside, how does this work? Well, it works great! Here are some screen shots to prove it:

ImageImage


I would like to think it is because of my super ninja / bow / stealth / flow skills, but the reality is this is just a really good piece of functionality. I really like the potential here. Imagine creating one flow that does this type of analysis and routing…you could use it all over the place!

Hope you enjoyed this…questions or comments, let me know!


Andrew