Way back in the old tyme days of 2014, Salesforce was running a contest called #Salesforce1selfie. I decided to try porting my clone user flow (Spoiler, totally worked) but that isn’t the fun part. The fun part was using flows for MY gain!
Andrew, Andrew Andrew
But, that was 2014 and it is now 2017 and Lightning is now the cool kid on the block. So, going to take a revisit to the old clone the user app and see about making it more 2017 than 2014.
Gru rocks
I do not know who 2 out of 3 of these artists are
First things first, I had to recreate the clone user flow. Surprisingly enough, you really just need to follow my previous mentioned post and you are good to go. You gotta make sure to activate it though.
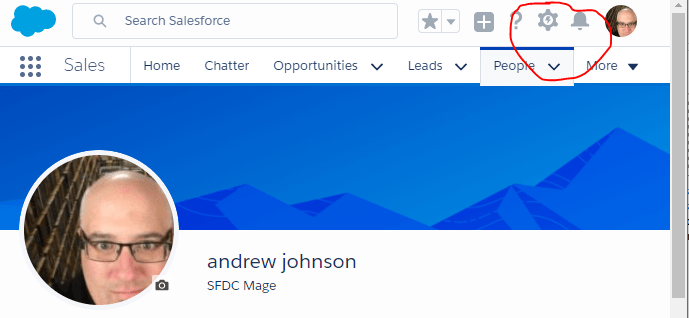
The real change is on the page layout. The easiest way to to do this is to go to a user record, click on the gear icon and then click on edit page. Sorry for the crappy screenshot, new computer.
Now that you are on the page edit layout (I am sure there is a better technical name!), I would do the following, though the ONLY required part is adding a flow widget.
Add in a tab widget.
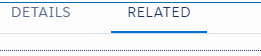
Reorder the tab widget so that related is on the right.
Rename details tab to your variation of clone user.
Drag a flow widget to that tab.
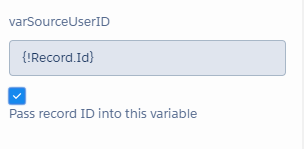
Set the flow to be your clone user flow and the variable to be the record id.
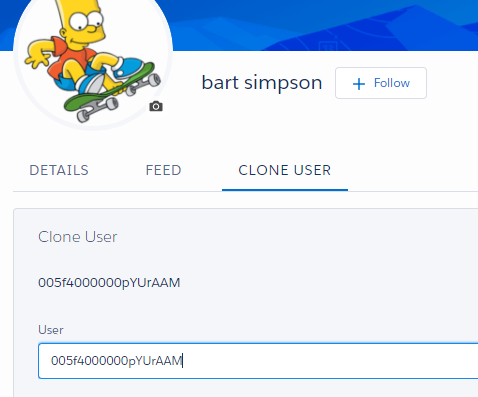
Go ahead and save the changes and make sure it is set to be the default of whatever you have setup. Click into a user profile and behold, the tab that says Clone User!
Click on that tab and WOOT, the user ID from the source is passed.
The rest is literal history. You don’t even need to really update the original flow!
Boy Howdy! It has certainly been a while since I have posted here! Hope everyone was missing me. I have a particularly interesting blog post for you all today…it explains my truancy AND talks about some neat stuff I have been doing!
But, first, we have to go back in time to August 1…You see, on August 1, 2016, I made the jump from where I was to a funky little place called Auth0. There I was, admiring a shiny new macbook and an almost pure like driven snow org when my boss interrupted my revelry by saying:”Hey, glad to have you, we just got Steelbrick and you will be configuring it”. Jump forward to August 10th and I am installing into Sandbox. The next 55 days were a blur (Oh yeah, we went live last Friday, 55 business days after starting!) …taking training, reviewing documentation, asking questions, redoing, redoing and redoing… The net result is, however, that on October 28th we went live with Salesforce CPQ.
Now that you know the setup, let’s get on with the rest of the blog. First off, some high level process orientated goodies.
Have someone who knows the company build out the smartsheet workbook…and it should not be the sys admin. I am SUPER fortunate in that my boss was able to crank out the smartsheet doc for me to start with. If I had to do this myself, it would have been a huge timesuck.
As a sys admin, figure on 100% participation on this one. I am estimating an easy 400+ hours to get this puppy up and running. Of course, if you read this blog post and follow some of my suggestions, you should be able to shave at least 10% off that total. But, long story short, make it widely known that this is your priority.
Simplify where you can. Do you really need that approval step? Do you really want a listing for Product X that makes you no money and you only sell once per year?
Embrace the Chaos – things will change. Stay flexible, learn the tool and prepare!
OK – think those are some good pieces of advice to start with. Now, let’s get into some fun stuff. Here are my top pieces of actual technical advice.
If you are running with basic approvals, build out your approval steps as formulas that can be referenced by the approval process. This is perhaps one of my favorite all around tips for salesforce, but super applicable here. Let’s say that you have an approval process that looks at a specific percentage field and you only want an approval to happen if that field is above 50%. IF you have activated that approval process and then need to make a change, you will have to clone / activate / test etc… However, if you make the approval step a yes / no formula that looks at your fields, you can adjust the formula without having to monkey with your approval steps.
~ What? You want SFDC specific stuff? OK – fine!~
Create an admin layout for quotes / quote lines. Seriously, go in there RIGHT NOW and do it. Then, add all the SFDCcPQ fields to that layout. This will save you a bunch of time.
On the topic of new things. Go forth and create a CPQ ADMIN App. You will then need to create a bunch of new tabs for it. I created tabs for block prices, line columns, actions (products / price), dimensions (products / price) and template sections. Throw that stuff along with the OOTB tabs on the admin app..you will thank me later.
Replace the “New Quote” button. So, just for a good exercise, after installing the package, create a quote with the out of the box new quote button. It is brutal. I replaced this with a “Create Quote” button that uses a flow to bring over all the fields I need and also to ask any questions. The net result is that I get less confusion and a way faster process.
I also want to call out the field “Watermark Shown” on the quote layout. This field is what controls if a watermark is shown or not. Add it to your layout and be aware that it defaults to unchecked, so will have to devise a mechanism to default it to checked (Cough, flow, cough).
I think this covers the basic stuff. I will try to write more as I think of it. Overall, the experience was a good one. I would HIGHLY recommend that if you are a small shop and you can spare your sys admin for a couple weeks that you try and do this yourself. It is totally doable and as an upside, you get to know where all the dark corners are and how to fix stuff on your own.
Anyone else mess with SDFC CPQ? What has been your experience? Any specific section of the above post you want me to expand on?
I started playing around with Salesforce Process builder and I figured I would give the world my 2 cents on this new functionality!
The process builder is a HUGE step forward. It is really cool, especially considering this functionality is less than a year old. If you were amazed by what you can do with #ClicksNotCode before, this will be mind blowing.
3 things I like:
Up to 5 decision points. Raise your hands if you have ever had to dissect a HUGE workflow with multiple gnarly logic steps…OK, this one is for you all. Stop weeping, process builder is going to help tremendously. What I like is that you can have up to 5 conditions grouped under a process that run really as separate statements.
Run LOADS of Actions. There is NOTHING quite a fun has building out a super awesome workflow and then rebuilding the logic so you can run an approval process #sarcasm. One place for all this stuff now!
Great UI. I love Visio. Seriously, love it. The UI of process builder makes documentation a snap since you can just grab a screen shot and see in pictures what the heck is going on. You know what would make this better though? A Nice “Click here to Print” button that would print out the process along with all the “stuff” with it. Yes, I used “stuff” as a technical term.
3 things I don’t like:
Versions are a PAIN. To be fair, this is a beef I have with Flows as well. I should be able to deactivate, make changes and then reactivate. One of the MAGIC things with workflows is that you could make a change, save it, test it and be done. With Process Builder, you have to clone, enter a new name (WHY!), save then activate. If you find something goofy, guess what, same dang process. Much like flows, you very quickly generate a TON of versions.
Speak it Grumpy Cat!
Can’t edit an inactive version. Yep, this is another versioning thing. One of the things I particularly like about flows is that I can step into a previous version, make edits and save it. Of course, there is a warning that I cannot over write the previous version, I have to save it as a new flow or new version of the flow. Sometimes, if your versions are different enough, you have to dig in and see what you could have done differently.
Replacing Precision Tools. You could create a flow trigger stupid fast. You could do it from multiple screens and you could edit it after you have associated it with a workflow. Here is a corny analogy. Let’s say that you noticed you have a screw loose on a piece of furniture. To tighten the screw, you would go and grab the cool screw driver with multiple bits out of your tool box and tighten the screw. This is like using a flow trigger. Just the minimum to get the job done! If you were to do this same action the process builder way, you would grab the WHOLE toolbox which includes tape measures, hammers, pliers, pencils etc…and bring it back to the furniture. Sure, the toolbox contains the screw driver and you are accomplishing the goal, but you just don’t have to lug that toolbox around.
So, that is that. Let me reiterate again…I love process builder and I think it is a fantastic piece of tech, but don’t take away the precision tools because the tool box is getting fancier!
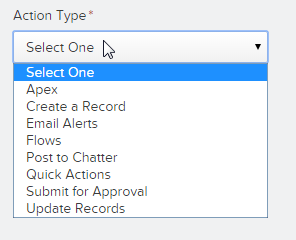
“PS – For bonus points, create a nice email alert telling the reps their data is bad, and make it so it sends them that notice every time they edit the account OR opportunity…just put on a timer so it only sends once per day!”
To which, JaneIsaac replied:
“nice detective work. Could you share What the timer formula look like?”
Well JaneIsaac, this post if for you!
I take requests…just not freebird!
The scenariois that we wanted to send out alerts if an account scored low data grade points and that account OR an opportunity related to that account was updated. After some quick research I saw that the updates were clustered, often receiving multiple updates in a short period of time. I didn’t want the alerts constantly kicking out.
So I built out a function so that prevent multiple alerts from being sent out in a given set of time. My functionality treats account and opportunity updates as two different actions, so I broke them out on this blog as such. Listing out the ingredients below and I will dissect the basic functionality after.
Ingredients for tasty food, not tasty Workflows
For the Account alerts:
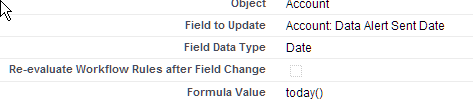
1 – Date field on Account “Data Alert Sent Date”
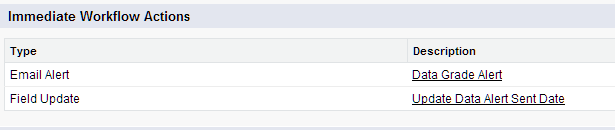
1 – Workflow rule for the Account Object “Data Grade Alert”:
Evaluation Criteria = “Evaluate the rule when a record is created, and any time it’s edited to subsequently meet criteria”
1 – Field Update = “Data Alert Sent Date” with Today()
Taking a look at the mechanics:
I wish my cube was this cool…or that I had a flying monkey!
The rule criteria’s are similar enough that we won’t have to dissect them both and since the interest is in the timer components, that is what I am going to focus on:
1) (DATEVALUE( Account.CreatedDate )<>Today()) – Ignore if the account is newly created
2) But, the following situations are OK:
(ISBLANK( Data_Alert_Sent_Date__c ) – The data alert sent date is Null (Never triggered before)
(Data_Alert_Sent_Date__c)<>TODAY() – The data alert sent date does not equal Today()
This last line is what ensures that an alert will only send once per day. If the rule runs, (Data Quality = Poor and “Data Alert Sent Date” <>Today()), then the email alert gets sent out and the “Data Alert Sent Date” gets updated with the current day. If that record was updated ANY OTHER TIME during that day, the rule will not fire. I know I say this all the time, but what I really (Really) like about salesforce is that when it comes down to it, you can do some crazy cool stuff with zero code.
In other CRM’s, the above functionality takes 6 weeks and 2 developers.
Looking at this functionality now, I think a couple neat additions would have been:
1) A rollup summary on opportunity.Data_Alert_Sent_Date__c (MAX), this way, you could have the account rule also looking at the last time an alert was sent out on ANY opportunity.
2) A counter field update on the opportunity rule with a corresponding rollup on accounts. This would allow for reporting on ignored updates and thresh holding of the alerts.
But, the fun with Salesforce is the ability to rapidly prototype and tinker, so if I wanted to add in some new stuff, it is easy – peasy – lemon squeezy.
Well, hope you enjoyed this. I certainly had fun taking a look at something that was built out quite some time ago but continues to keep ticking! If there are any special requests, just let me know!